


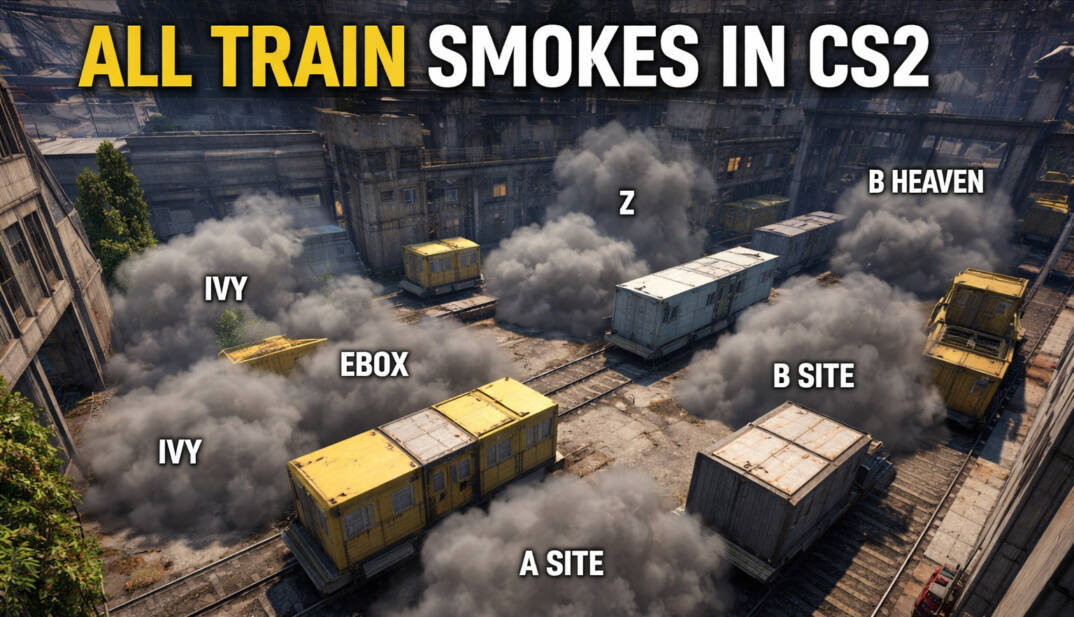
All Train Smokes in CS2
Train in CS2 doesn’t forgive sloppy movement. The map is built around long, open sightlines and narrow corridors between trains, and most positions overlap each other. If you walk into that without cutting vision, you’re exposed from half the map at once. That’s why train smokes CS2 are such a big topic: on this map, smokes aren’t a bonus, they’re the way you’re even allowed to move.
This article sticks to what each smoke actually does on the map. You won’t find execute playbooks or round plans here. Instead, every commonly used competitive smoke on Train is explained by three simple things: where it lands, which angles it blocks, and what piece of space it takes out of the fight. The idea is to make it clear what problem each smoke solves, not how to throw it.
The scope is limited on purpose. It covers the standard CS2 train smokes and looks at them from a map-control point of view with a clean breakdown of how smokes change vision, isolate positions, and let you move through one of the most angle-heavy maps in the game.
How Smoke Coverage Is Structured on Train
Instead of dumping every train cs2 smokes example into one long list, this guide is split by the parts of the map where those smokes actually live. Train is easy to break into practical zones: T Main, the A site lanes, Ivy, Connector and mid cuts, Popdog/Ladder, and the B site. Each of these areas has its own sightlines and its own problems, so looking at smokes inside those borders makes it clearer what each one is meant to affect.
Almost every smoke on Train exists for the same reason: the map has sightlines that are too long and angles that stack on top of each other. One position can often see far deeper than it should. Smokes are used to shut those lines down and to split the map into smaller, separate pieces, so vision doesn’t overlap across half the round.
The vertical side of Train changes how coverage works. There are train roofs, elevated platforms, ladders, and upper walkways, which means you can have a smoke that looks fine on the floor and still leaves someone with a clean view from above. Placement depth matters for the same reason: too shallow or too deep, and an angle stays open even though the smoke looks “close enough.” To avoid confusion, every smoke in this guide is described using the same structure:
- Landing area: the exact zone where the smoke ends up.
- Blocked sightlines: the specific lanes or angles that lose vision.
- What it isolates: the part of the map that gets cut off from the rest.
- Common mistakes: the usual issues, gaps, bad depth, or missed vertical angles.
Understanding Train’s Map Layout Through Smoke Coverage
When you start looking at Train through smokes instead of just callouts, the train map layout finally clicks. The main areas (T Main, A site, Ivy, Connector, Popdog, and B site) aren’t just separate chunks of the map. They’re all tied together by long sightlines and angles that bleed into each other in ways that can be hard to track until you really pay attention to vision.
That’s usually why people go looking up CS2 smokes train in the first place. The map has a habit of letting one position see way too much space, and another position back that up from a different angle or even from above. If nothing blocks those views, everything overlaps, and every open area feels like it’s being watched from three directions at once. Here’s how those areas connect when you think in terms of what can see what:
- T Main runs straight into the A side lanes, and those lanes are basically long sightline tunnels between the trains. If they’re open, one angle can control a huge chunk of space.
- Ivy looks into that same A-side space from the side, which means more angles stack on top of the ones coming from the lanes.
- Connector sits between the halves of the map and lets vision leak from one side to the other, so blocking it changes how much the areas can “help” each other.
- Popdog throws height into the mix, giving extra angles into A that don’t line up with ground level and can slip past badly placed smokes.
- B is further away, but it plays by the same rules: long approaches, layered angles, and sightlines that stay connected unless something gets in the way.
This is where smokes really do their work on Train. They don’t just cover a corner or a doorway. They cut those long visual connections and stop different parts of the map from staying linked all the time. It also helps to think about smokes in two simple groups:
- Lane smokes shut down long, straight sightlines so one position can’t watch half the map from a distance.
- Cut smokes break the link between two areas, so they can’t see or support each other for a bit.
T Main Smokes and Entry Lanes
T Main is one of those train map areas where you immediately feel how exposed you are. A-side has a bunch of long angles that can look straight into Main, and if nothing blocks them, this place turns into a straight-up shooting gallery. That’s why cs2 train t smokes around T Main are mostly about chopping those sightlines down and making the space feel smaller and more contained. From the Main side, three smoke coverages keep coming up:
Z Connector vision denial
- Landing area: The smoke sits in the Z Connector opening toward A.
- Blocked sightlines: It kills the direct view from Connector into T Main and the entry lanes.
- What it isolates: Connector gets visually cut off from the Main-to-A approach.
- Common mistakes: It lands a bit too shallow and leaves a gap, or it goes too deep and still leaves a thin angle on the edge.
E-Box angle coverage
- Landing area: The smoke settles around E-Box on the A side, right on the angle that looks back into Main.
- Blocked sightlines: It shuts down the E-Box line that watches people coming out of T Main into the lanes.
- What it isolates: E-Box stops being able to see and interact with the Main entry space.
- Common mistakes: The smoke doesn’t quite fill the angle and leaves a small sliver, or it sits slightly off and still allows a tight peek.
Back Green / deep A vision line coverage
- Landing area: The smoke lands deep toward Back Green on A, right on the longest line that looks into the approach from Main.
- Blocked sightlines: It removes that deep A view that can see way down into the lanes.
- What it isolates: Deep A positions get cut off from the Main-side approach.
- Common mistakes: It’s too shallow and doesn’t block the full depth, or it’s placed in a way that leaves part of the upper or side vision open.
A Site Smokes on Train
A on Train isn’t one clean, open space. It’s a stack of narrow lanes between trains, with angles that run deep and overlap in annoying ways. That’s why areas like a site train, ivy train, connector train, and popdog train all end up tied together by vision if nothing blocks it. Add long looks from z connector train, deep positions like back green train, and awkward angles around e box train, and you get a site where a smoke that’s slightly off can still leave half the site visible.
Depth is the big problem here. On A, a smoke can look fine from one angle and still leave a thin line open that stretches through multiple lanes. Because the site is so long, those tiny gaps matter. Some smokes here are about killing a single lane. Others are about cutting the site into chunks so different parts stop seeing each other. Below are the main A-site smoke coverages, each with a short explanation of why it exists before the details.
Z Connector smoke
This smoke is about stopping vision coming from the Connector side into the heart of A. Z is one of those spots that can look deep into the site if it’s left open, so cutting that line changes how much of A is visible from that direction.
- Landing area: The smoke sits in the Z Connector opening into A.
- Blocked sightlines: It removes the straight view from Z Connector into the A lanes.
- What it isolates: Z Connector gets visually cut off from the core of the A site.
- Common mistakes: It lands too shallow and leaves a side gap, or too deep and still gives a thin angle on the edge.
E-Box smoke
E-Box is a classic angle that looks across lanes and catches movement between trains. This smoke exists to take that specific line out of the picture and stop it from watching the center of the site.
- Landing area: The smoke settles around the E-Box area on A.
- Blocked sightlines: It shuts down the E-Box angle that looks across the site lanes.
- What it isolates: The E-Box position stops being directly connected to the central A lanes.
- Common mistakes: The smoke doesn’t fully fill the angle and leaves a narrow sliver, or it sits slightly off and still allows a tight line of sight.
Back Green smoke
Back Green is one of the deepest viewpoints on A, and it can see far down multiple lanes. This smoke is there to kill that long, uncomfortable line that stretches across the site.
- Landing area: The smoke lands deep toward Back Green.
- Blocked sightlines: It cuts the long, deep view from Back Green across multiple A lanes.
- What it isolates: Deep A positions get separated from the rest of the site.
- Common mistakes: The smoke is too shallow and doesn’t block the full depth, or it leaves part of the upper vision open.
Ivy Cross smoke (A-side cross protection)
Ivy connects into A from the side and creates nasty cross-angles into the lanes. This smoke is meant to block that crossing and stop Ivy from having a clean look into the site.
- Landing area: The smoke sits on the A-side crossing from Ivy into the site.
- Blocked sightlines: It blocks the cross-angles between Ivy and the main A lanes.
- What it isolates: Ivy gets visually separated from the core A site space.
- Common mistakes: The smoke leaves a gap toward one side of the cross or doesn’t cover enough width.
Bomb Train lane smoke
The Bomb Train area sits on one of the main straight lanes through A, which makes it a long, dangerous line if it stays open. This smoke focuses on breaking that lane specifically.
- Landing area: The smoke lands along the lane near the Bomb Train area.
- Blocked sightlines: It blocks one of the main straight lanes running between the trains.
- What it isolates: That specific lane gets cut off from the rest of the site lanes.
- Common mistakes: The smoke is too narrow and leaves an edge open, or it’s too shallow and doesn’t cover the full length of the lane.
Lane cut smokes between key trains (site segmentation)
Sometimes the goal isn’t to block a single position, but to split the site itself into two parts. These smokes are placed between trains to break long lines that run straight through A.
- Landing area: The smoke sits between two key trains, right in the middle of a shared lane.
- Blocked sightlines: It blocks vision straight through the lane from one side of A to the other.
- What it isolates: The A site gets split into two visual sections that can’t see each other.
- Common mistakes: The smoke doesn’t reach far enough and leaves a long-angle gap, or it’s off-center and still allows a narrow sightline.
Ivy Smokes and Outer Lane Control
Ivy is one of those places where you feel exposed the second you step into it. It’s a long, straight corridor with clean angles looking straight down it, and if a smoke is even a little bit off, you get a full, usable sightline staring right at you. That’s what makes Ivy so punishing. The lane is long enough that any mistake in coverage gets punished from way farther away than you expect. Smokes here are mostly about taking those long looks away and stopping the whole lane from acting like one endless shooting range.
Deep Ivy smoke (blocking A-site vision into Ivy)
This smoke is there because A-side positions can see way too far down Ivy if nothing stops them. It’s meant to kill that deep, uncomfortable line that runs straight from the site into the lane.
- Landing area: The smoke sits deep in Ivy, closer to the A-side end of the corridor.
- Blocked sightlines: It cuts the long view from the A lanes into Ivy.
- What it isolates: Ivy stops being directly visible from those deep A-side angles.
- Common mistakes: It lands too shallow and leaves a big angle open, or it drifts off to the side and creates a thin but very real gap.
Ivy isolation smoke near the lane entrance (tight lane segmentation)
This one is about stopping Ivy from being one long, continuous hallway. Instead of dealing with the whole lane at once, it breaks it into smaller pieces right at the entrance.
- Landing area: The smoke sits near the Ivy lane entrance, on the approach into the corridor.
- Blocked sightlines: It blocks straight-through vision along the lane from front to back.
- What it isolates: The front part of Ivy gets separated from the deeper section of the lane.
- Common mistakes: The smoke doesn’t cover the full width and leaves a side gap, or it lands too deep and doesn’t actually cut the entrance area.
A-lane cut smoke from Ivy side (separating outer lanes)
This smoke is there to stop the outer lanes from staying visually connected to each other.
- Landing area: The smoke sits on the A-lane connection as seen from the Ivy side.
- Blocked sightlines: It blocks the cross-lane view that lets A-side lanes and Ivy see and support each other.
- What it isolates: The outer lanes get split so they can’t directly interact through that line of sight.
- Common mistakes: The smoke is too narrow and leaves a slice of vision open, or it’s too shallow and still allows a long-angle peek across the cut.
Connector and Mid-Cut Smokes
Connector is one of those spots on Train that quietly causes a lot of problems. It sits between big areas and lets vision bleed from one side of the map into another. Leave it open, and suddenly angles from different zones start stacking and overlapping in weird ways. That’s why “cut” smokes matter here. You’re cutting the line that lets two areas keep seeing and supporting each other.
This part isn’t about where to go or when to go there. It’s just about what happens to the map when you take those sightlines away.
Connector vision denial smoke
This smoke is the simplest way to deal with Connector itself and stop it from acting like a window between areas.
- Landing area: The smoke sits in the main Connector opening, right on the core line of sight through it.
- Blocked sightlines: It kills the direct view through Connector into the nearby lanes and spaces.
- What it isolates: The areas on each side of Connector stop seeing each other and turn into two separate visual zones.
- Common mistakes: The smoke lands a bit off and leaves a thin angle on one side, or it’s too shallow and still lets part of the view through.
Mid-lane cut smoke between A lanes and Connector
This one isn’t really about the Connector doorway. It’s about the lane that links Connector to the A-side lanes and keeps them visually glued together.
- Landing area: The smoke sits in the mid-lane space between the A lanes and the Connector entrance.
- Blocked sightlines: It blocks the straight view from the A lanes into Connector and back the other way.
- What it isolates: The A-side lanes and Connector stop being one long shared sightline and become two separate spaces.
- Common mistakes: The smoke doesn’t go far enough and leaves a long-angle gap, or it’s placed too narrow and leaks vision along the edge.
Support-denial smoke that blocks visibility between key lanes
This kind of smoke is about killing the sideways looks that let one lane back up another. It’s less obvious, but it changes how much space overlaps.
- Landing area: The smoke sits on the connecting line between two key lanes near Connector.
- Blocked sightlines: It blocks the cross-lane view that normally lets one lane see into the other.
- What it isolates: The two lanes stop overlapping visually and turn into separate chunks of space.
- Common mistakes: The smoke is a bit too shallow and still leaves a thin, long angle, or it’s slightly off and leaves a corner of vision open.
Popdog and Ladder Room Smokes
Popdog and ladder room are the parts of Train that always feel a bit sketchy, even if you know the map well. This whole area is built around height: the ladder room train, the drop, the lower ramp train, and angles that look both up and down at the same time. You’re dealing with real vertical sightlines here, not just normal corners, and everything gets squeezed through tight choke points. The result is simple: a smoke can look perfect from one level and still leak vision from the other.
That’s also why smoke depth matters so much here. In a vertical space, being slightly off creates one of those annoying “hidden” angles from above or below that you don’t notice until someone uses it. The three main smokes in this area exist to deal with that exact problem.
Bottom ladder smoke (blocking lower drop vision)
This smoke is for the lower side of the ladder area, where people can watch the drop and the space above it.
- Landing area: The smoke sits at the bottom of the ladder/drop area near the lower ramp side.
- Blocked sightlines: It cuts the view from the lower level up toward the ladder opening and the drop zone.
- What it isolates: The lower ramp area gets visually separated from the space above the ladder.
- Common mistakes: The smoke lands a bit too shallow and someone can still see over it from below, or it’s off to one side and leaves a thin vertical gap.
Top ladder smoke (blocking upper peek vision)
This one handles the opposite problem: angles from the top of the ladder looking down into the lower space.
- Landing area: The smoke sits near the top of the ladder room opening, right on the edge of the drop.
- Blocked sightlines: It removes the downward view from the top of the ladder into the lower area.
- What it isolates: The upper ladder room gets visually cut off from the lower ramp and drop zone.
- Common mistakes: The smoke doesn’t go far enough and still leaves a slim look-down angle, or it goes too deep and leaves the upper edge open.
Popdog exit smoke (reducing multi-level exposure)
This smoke is for the exit itself, where multiple heights can look into the same space at once. It’s there to simplify that mess of angles.
- Landing area: The smoke sits at the Popdog exit, covering the main opening into the next area.
- Blocked sightlines: It blocks the straight horizontal view and also cuts part of the vertical overlap from upper and lower positions.
- What it isolates: The Popdog interior gets visually separated from the outside lanes and ramps.
- Common mistakes: The depth is off, so one level is covered but the other still has a clean angle, or it leaves a corner open on one side.
B Site Smokes on Train
B on Train is tight and kind of claustrophobic. There’s no room to be sloppy here: just a few narrow paths, a couple of trains, and a bunch of short angles that all point into the same small space. That’s why smokes on B are mostly about angle denial and clean smoke coverage. You’re not trying to cover “a lot” of the map. You’re trying to delete very specific lines of sight in a very small area. If a smoke is a bit shallow or leaves a tiny gap, that gap usually means one angle is still fully alive. And because everything is so close, you notice it immediately. Some of these smokes also end up acting like rotation denial, just because they cut the visual links that normally keep areas connected.
Lower Ramp smoke
This smoke is here because the ramp is one of the cleanest ways to see straight into B.
- Landing area: The smoke sits on the lower ramp entrance into the site.
- Blocked sightlines: It cuts the direct view from the ramp into the B site and the nearby trains.
- What it isolates: The ramp approach gets visually separated from the core of B.
- Common mistakes: The smoke is a bit too shallow and leaves a gap near the edge, or it doesn’t fill the width of the ramp and leaks vision along the side.
Connector-to-B vision smoke
In a space this small, the Connector line matters more than it seems. This smoke stops that doorway from acting like a window into the whole site.
- Landing area: The smoke sits in the Connector opening that looks into B.
- Blocked sightlines: It removes the straight view from Connector into the site.
- What it isolates: Connector and B stop being one shared visual space.
- Common mistakes: The smoke is slightly off and leaves a thin angle, or it’s placed too deep and still allows a corner peek.
Back site B smoke
Back site spots can see across more of B than you’d expect if they’re left open. This smoke takes that deeper look away.
- Landing area: The smoke lands toward the back of the B site, near the rear trains and wall.
- Blocked sightlines: It blocks the long view from the back of site across the main B area.
- What it isolates: The back of B gets visually cut off from the rest of the site.
- Common mistakes: The smoke doesn’t go deep enough and still leaves part of the angle alive, or it leaves side vision open around the trains.
Close-angle isolation smoke near site trains
B is full of short, awkward angles right next to the trains. This smoke is about removing one of those close peeks from the picture.
- Landing area: The smoke sits near the site trains, right on a tight corner angle.
- Blocked sightlines: It blocks a short, close line of sight into the main site space.
- What it isolates: That close position gets visually cut off from the rest of B.
- Common mistakes: The smoke doesn’t fully cover the corner and leaves a small gap, or it’s placed too far away and doesn’t actually hide the angle.
Vertical Sightlines and Height-Based Smoke Logic
Train has a bad habit of making your smokes look great right up until you get shot from somewhere above you. That’s because this map isn’t flat in any useful way. You’ve got train roofs, platforms, ladders, and little raised spots all over the place. So the same bit of ground can be watched from two different heights at once. If your smoke only deals with one of those, the angle isn’t really gone.
You’ve probably seen this already in the A lanes, in Ivy, or around Ladder and Popdog. A smoke looks perfect at floor level, but someone still has a clean view from higher up. Or it blocks the close part of a lane, but the far, elevated angle is still wide open. That’s usually where those “wait, how did he even see me?” moments come from.
Instead of judging a smoke just by where it lands, it helps to run through a quick reality check:
- Does it block the angle from both the ground and from higher spots? If it only works for one height, you’re still exposed somewhere.
- Can you see a thin strip over the top or around the edge? Those tiny gaps are way more dangerous than they look, especially on long lanes.
- Is it deep enough to actually kill the whole line, not just the near part? On Train, a shallow smoke often means the far end of the angle is still perfectly usable.
CT-Side Smokes: Defensive and Retake Utility (Non-Tactical)
This part isn’t about telling you how to play CT or where to stand. It’s just about what CT smokes actually do to the map. Each one has a pretty simple job: block a view, cut an entry line, or throw up a temporary wall that turns an open angle into nothing for a bit. Think of these as tools for messing with vision, not as instructions for running a round.
On Train, that difference really shows. A smoke that’s a little bit off doesn’t “kind of” work. It usually just leaves the angle alive. A small gap or a shallow placement is often all it takes for someone to still have a clean look.
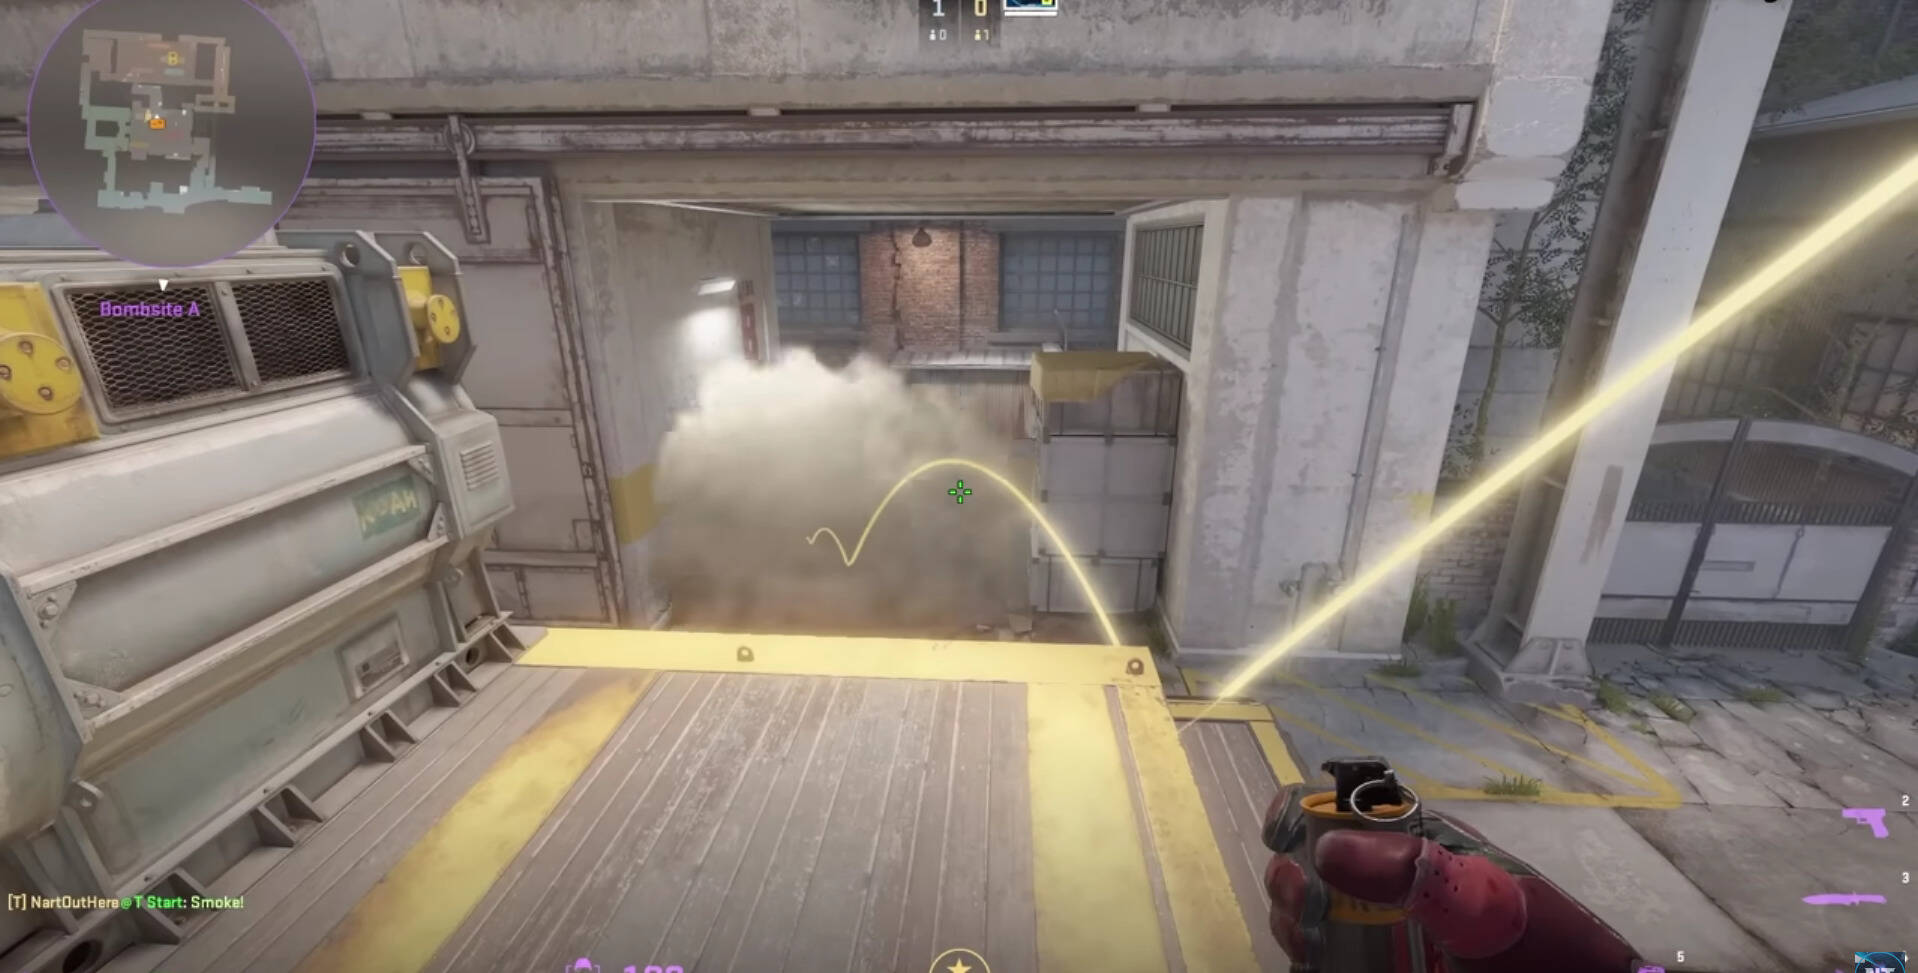
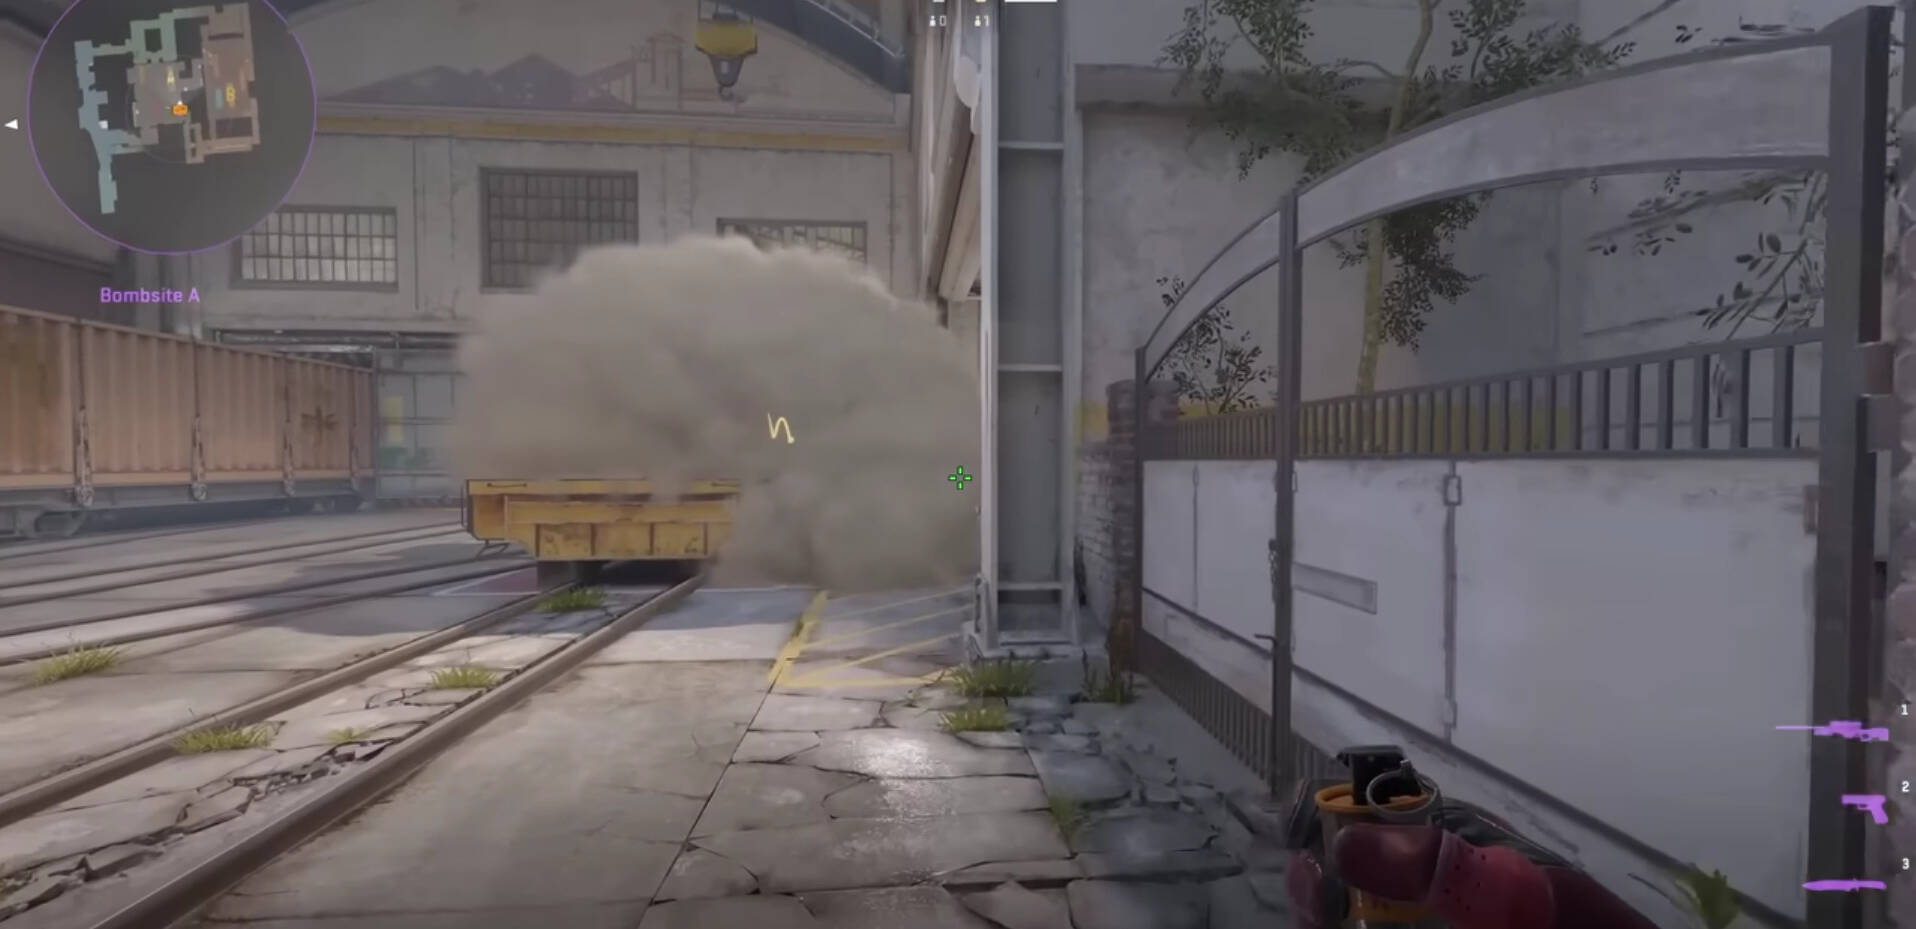
T Main vision-denial smoke (A-side)
This smoke is there to stop A-side vision from running straight out of T Main into open space.
- Landing area: The smoke sits in the T Main opening on the A side.
- Blocked sightlines: It cuts the direct view from T Main into the A lanes and nearby angles.
- What it isolates: T Main gets visually separated from the A-side lanes.
- Common mistakes: It lands a bit too shallow and leaves a side gap, or it doesn’t fill the width of the opening and leaks vision along one edge.
Ivy defensive smoke (long corridor vision block)
Ivy is basically one long hallway, so this smoke exists just to delete that stretched line of sight.
- Landing area: The smoke sits in the Ivy lane, covering the main corridor view.
- Blocked sightlines: It removes the long, straight view down Ivy.
- What it isolates: The two ends of Ivy stop seeing each other and become separate visual zones.
- Common mistakes: The smoke is too shallow and still leaves a deep angle open, or it’s off-center and creates a narrow but very real gap.
A-site stall smokes (blocking key entry sightlines)
These smokes are about shrinking how much of A can be seen at once by killing specific entry angles into the site.
- Landing area: The smoke sits on a key A-site entry line, covering one of the main views into the site lanes.
- Blocked sightlines: It blocks a primary entry angle that looks into the A lanes or across the site.
- What it isolates: The entry side of A gets visually separated from the inner site lanes.
- Common mistakes: The smoke doesn’t go deep enough and leaves part of the lane visible, or it leaves an edge gap near a train or wall.
B-site choke smokes (temporarily blocking entry angles)
B is cramped, so these smokes focus on removing one of the short, uncomfortable entry views into the site.
- Landing area: The smoke sits on a main choke point leading into B.
- Blocked sightlines: It blocks the direct view through that choke into the site.
- What it isolates: The approach path gets visually separated from the core of B.
- Common mistakes: The smoke is slightly off and leaves a corner visible, or it’s too shallow and still allows a clean look past the edge.
Situational and Support Smokes (Less Common but Useful)
Not every smoke on Train is something you throw every round like clockwork. Some of them only come out when a very specific angle starts being annoying: a support line that suddenly matters, a sketchy cross that feels way too open, or a lane that just needs to disappear for a few seconds. These smokes aren’t part of some fixed plan. They’re there for the moment, when the map shows you a problem and you just want that line of sight gone. To keep this section useful, everything here has one clear job.
Ivy side support-cut smoke
This one is for when Ivy and the nearby outer lane are basically staring at each other and sharing way too much space.
- Landing area: The smoke sits on the line that connects Ivy to the adjacent outer lane.
- Blocked LoS: It blocks the cross-angle that lets Ivy and that lane see into each other.
- What it isolates: Ivy and the outer lane stop being one shared angle and become two separate visual spaces.
- Common mistakes: The smoke is too narrow and leaves a thin slice of vision, or it’s too shallow and still lets a long-angle look through.
A-lane re-smoke (temporary lane reset)
This is for those moments when one A lane just needs to be gone again, without touching the rest of the site.
- Landing area: The smoke sits directly in one of the A-site lanes between the trains.
- Blocked LoS: It removes the straight, long view down that specific lane.
- What it isolates: That lane gets visually cut off from the rest of A.
- Common mistakes: The smoke doesn’t go deep enough and leaves the far end of the lane visible, or it’s a bit off and leaks vision along one side.
B-site cross-cover smoke
This one is about hiding a short but scary cross where even a quick look can be enough to cause problems.
- Landing area: The smoke sits on the crossing line between two pieces of cover on or near B site.
- Blocked LoS: It blocks the short line of sight that watches that crossing space.
- What it isolates: The two sides of that cross stop seeing each other while the smoke is up.
- Common mistakes: The smoke is too shallow and doesn’t cover the full width of the cross, or it leaves a corner gap that keeps the angle usable.
Popdog-to-lane support-cut smoke
This one comes up when Popdog and a nearby lane start stacking angles on top of each other, especially with the height difference involved.
- Landing area: The smoke sits on the line between the Popdog exit and the adjacent lane.
- Blocked LoS: It blocks the direct view that lets Popdog and that lane see into each other.
- What it isolates: Popdog and that lane stop acting like one combined angle set and become two separate visual spaces.
- Common mistakes: The depth is off, so one height is covered but the other still has a clean angle, or an edge gap is left open.
Common Mistakes When Using Train Smokes in CS2
Train is really good at exposing bad smokes. The map has long lanes, stacked angles, and a lot of height differences, so a “close enough” smoke usually just means there’s still a clean line of sight somewhere. Here are the mistakes that cause most of those problems:
- Shallow smokes: This is the classic one. The smoke blocks the near part of a lane, looks fine at first glance, and then someone still has a perfect view from deeper in the lane. On Train, angles are long, so if the smoke doesn’t go far enough, you’ve just moved the danger a bit farther away.
- Visible gaps: Tiny strips at the top of a smoke, thin edges along a wall or train, little slices between pieces of cover. They don’t look scary, but on Train they turn into real, usable angles because the sightlines stretch so far. “Almost covered” is usually just “still open.”
- Wrong depth: Sometimes the smoke goes too far, sometimes not far enough, and either way it lines up badly with the angle you actually wanted to kill. You end up covering the wrong part of the lane and leaving the important part alive. On a map like this, that mistake shows immediately.
- Overlapping utility: Throwing two smokes on basically the same line feels safe, but most of the time it just wastes one while some other angle stays wide open. Train has too many parallel lanes and cross-angles for that. If you’re double-covering one spot, you’re probably ignoring another.
- Forgetting about height: Train isn’t flat. There are train roofs, platforms, ladders, all sorts of raised spots. A smoke can look perfect from where you’re standing and still leak vision from above or below. That’s where those “how did he even see me?” moments usually come from.
Final Thoughts about Train Smokes in CS2
Train is one of those maps where what you can see matters more than almost anything else. The lanes are long, the angles stack on top of each other, and there’s always some spot that can see farther than you expect. That’s why this whole guide stayed focused on smoke coverage. On Train, a smoke is how you take a nasty sightline out of the game and make a space easier to deal with.
Once you get used to thinking in terms of where smokes land, what they actually block, and what parts of the map they split up, Train starts to feel a lot less chaotic. Instead of one big, stressful web of angles, it turns into a bunch of smaller areas with clear visual limits. That alone cuts down on those moments where you feel exposed from half the map.
There’s no secret formula here. The point is simply that good smoke coverage makes the map easier to read. When vision is under control, those long, punishing angles stop being a constant question mark: you know exactly which ones are still there, and which ones are gone.
Frequently Asked Questions about Train Smokes in CS2
Why do smokes matter so much on Train?
Because the map is basically a bunch of long lanes glued together, with angles stacked on top of each other. Leave one sightline open and it can cover way more space than you expect. Smokes are how you cut that vision down to something manageable.
How can I tell if a smoke actually works the way it should?
Don’t just look at it from one spot. Check if it blocks the angle from above and below, see if there’s a thin strip around the edge or the top, and make sure it goes far enough. If any part of the lane is still visible, the angle isn’t really gone.
Why do I still get spotted when the smoke looks fine?
Most of the time it’s either too shallow or it’s missing a vertical angle. On Train, a smoke can cover ground level and still leak vision from higher up, or block the close part of a lane while the far end stays open.
Are Train smokes actually harder to learn?
Not really. They’re just less forgiving. Being a little bit off with placement matters more here because the sightlines are long and clean.
For CS2 Train smokes on T side, should I learn a ton of smokes or just a few?
A few, done well. It’s better to have a small set you can place cleanly every time than a big list that sometimes leaves gaps or misses the depth.
Why does throwing two smokes on the same angle feel like a waste?
Because Train has too many lanes and cross-angles. If you double up on one view, there’s usually another important line of sight somewhere else that stays wide open.